Tuition-Based Recurring Billing Plans
- 29 Jan 2024
- 2 Minutes to read
- Print
Tuition-Based Recurring Billing Plans
- Updated on 29 Jan 2024
- 2 Minutes to read
- Print
Article Summary
Share feedback
Thanks for sharing your feedback!
How to setup tuition-based billing plans
Watch this quick video on how to set up a tuition plan.
Steps for Setting Up a Tuition Plan:
- Navigate to Billing > Recurring Plans, then select Create Recurring Plan.

- Select Tuition Plan from the popup.

- Choose the students you wish to assign the plan to. Use the Search, Rooms, Tags or No Assigned Plans fields to filter the students. Then click Continue.

- On the Create Tuition Plan popup, complete the necessary fields:

- Create New or Pick Template – select a template from the drop-down or select New Plan to create a new plan.
- Plan Name – enter the plan name. Recommendation: If setting up multiple charges, such as sibling rates, staff rates, toddler rates, etc., we recommend naming it after those rates. If setting up only one charge, such as weekly, bi-weekly, monthly, etc., naming the plan after the cycle is a good option.
- Plan Cycle – choose your plan cycle. If your billing cycle is different than the plan, we recommend creating manual invoices.
- Plan Start – select the date the system should begin sending out invoices with these specified charges.
- Plan End – the system will stop sending invoices with these charges on the date selected here. Recommendation: We recommend not setting an end date, if set incorrectly, it will cancel the plans unexpectedly and risk not sending invoices. You can manually cancel the plan as soon as you wish to stop invoicing.
- Generate Invoice on details – select the details of when your invoices should be generated. If parents have auto-pay enabled, funds will automatically be deducted on the invoice due date.
Please keep the following in mind: 1.) When selecting Weekly or Bi-Weekly, the dates can be selected for Monday through Sunday of the same week. There is no option to create an invoice in week one and have it due in week two. 2.) To see how each billing cycle option will charge, change the plan to each option and see how the dates are affected in the green preview bar.

- Then complete the Invoice Details with your charges:

- Type – select the type of charge to setup (New Item, Preset Item, Discount, Subsidy).
- Item Description – enter the invoice description.
- Amount – enter the amount of the charge.
- Add Invoice Item – use this option to add additional charges.
- For the ability to assign this plan to students in the future, click Save as Template. Then click Continue.
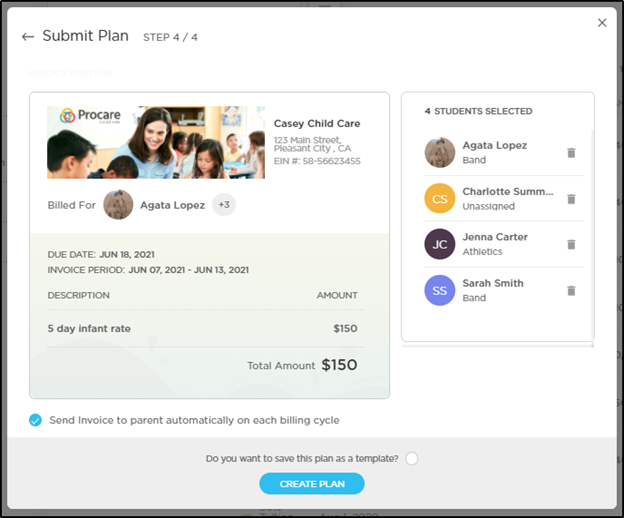
- Ensure the invoice looks correct and click Create Plan.


Making Changes to Plans
After plans have been assigned to students, you can do the following by clicking the ellipsis from the Billing > Recurring Plans screen.
- View Next Invoice
- Edit Plan
- Pause/Resume Plan
- Cancel Plan
Please Note: Once a plan has been assigned to students, the plan dates cannot be changed, only the charges can be modified. If dates need to be updated, the plan will need to be canceled and a new one will need to be assigned.

Was this article helpful?